Call Recording Laws
Before recording calls, it is essential that the user understand the laws pertaining to call recording for their area, as well as the laws in the caller’s area. While United States federal law only requires that at least one party taking part in the call must be notified, state laws can add further statutes requiring notification or consent from all parties involved.
The user must consider interstate phone calls, as the two states could have different laws. In cases such as this, it is the safest to err on the side of caution and assume that the stricter state law applies. If in doubt about the laws for your area, the best practice is to ensure that both parties are informed that the call is being recording.
All NocTel Flow users should check their local laws before using call recording, for more information on call recording in your state check out some of the links below that provide a state by state guide or contact a legal professional in your area.
RCFP is geared towards reporters, but their state by state guide covers electronic communication statutes: https://www.rcfp.org/reporters-recording-guide/state-state-guide
The Association of American Physicians and Surgeons offers a state by state guide on recording calls: https://www.aapsonline.org/judicial/telephone.htm
Disclaimer: This article does not constitute legal advice.
Enabling Call Recordings
Call recording can be enabled for a Queue during queue setup, or modifying an existing queue by clicking on the queue in the queue list and checking the corresponding call recording box in the queue options to enable it. Call recording can also be activated per agent on the individual's agent edit page. Enabling call recording in a Manager user level function.
Viewing Call Recordings
All recordings from Queues and Agents are stored in the Call Recording section of Flow. To access the list of recordings simply click on the Call Recording button in the left-hand main menu. The Call Recording section can be viewed by users with access levels of Supervisor or higher.
Searching for a Recording

The Call Recordings main page allows the user to search for calls based on several criteria:
- Call ID: filter search results based on the unique call ID assigned by Flow to each call.
- Agent: filter search results based on the agent’s name or number.
- Queue: filers search results based on a queues name.
- Stamp: allows the user to search for a call recording based on the call’s time and day stamp. When searching for a specific date the user should enter the data as it would appear in the call recording table. For example dates should be entered in yyyy-mm-dd format.
- Mark: checking the Mark checkbox limits the search to only calls that have been previously marked by a user.
- Random: returns the search results in a randomized order. This can be useful for spot checking agent’s calls.
Once search criteria is entered in the search fields, press the search button to update the call recording list.
Individual Call Recordings and User Tools
Clicking on a recording in the list will bring up the recording's detail page. On the call’s detail page users can:
- Playback the audio for the call.
- View an automatically generated transcript of the call.
- View call information: Call ID, Stamp, Agent, and Caller ID info.
- Add Timestamps to the call and add notes.
- Mark the Recording

The Call Playback and transcript sections for an individual recording in Flow.
Call playback tools and shortcut keys:
- Stop Button or esc key: stop a recording in playback
- Play Button or Tick key (`): Play/pause.
- Timestamp button or Shift + Tick key (denoted by the clock symbol): adds the timestamp of where the playback cursor is located in the playback area to the notes section. Further notes can be added to the note section.

When making timestamps or notes to the call remember to press the Save button at the bottom before leaving the call recording page.
Timestamp notes and Marking Calls
Within the recording detailed page a user can make notes in the Call Notes section by using the Timestamp Button or shortcut key, or by typing in a note. Calls can also be marked by using the Mark Call Checkbox. Checking the box allows the call to be searchable in the Call Recordings main page as a marked call. When finished adding notes to the call the user needs to press the Save button, to save the new info to the Call recording.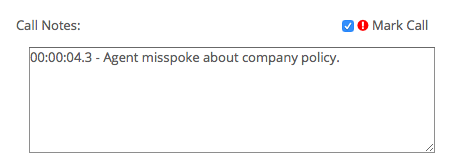
Related articles
Overview
Content Tools