...
- Click on the Inbound Routing virtual extension to direct call flow based on time or day.
- Click on the Edit link in the Inbound Behavior area. This will open up the Steps Page for the extension.

- Set Step 1 to “Preform Next Step Only if…” by selecting it from the drop-down list.
- Inside the “Preform Next Step Only if…” are several options. For this setup, select INSIDE for the first option. Then select the schedule created in the Routing Schedule drop-down box.
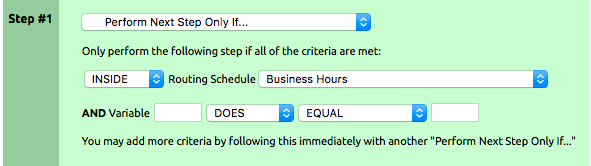
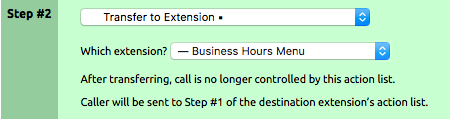
Once a call reaches this extension, the system will check to see if the call is INSIDE the routing schedule called Business Hours. If the call is inside the hours specified, then the call will progress to step 2. If the call is not outside the scheduled time, it will skip step 2 and proceed to step 3. - For Step 2, select “Transfer to Extension” as the main function in Step 2 and select the “Business Hours Menu” from the list in the “Which extension?” area.
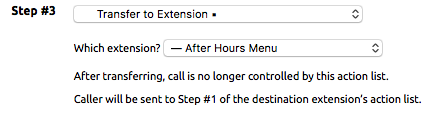
- Step 3, which only occurs if the if statement is false (because Step 2 would have transferred the call to another extension), will control where the call goes outside of business hours. For this step select “Transfer to Extension” as the function and select “After Hours Menu” in the “Which extension?” list.
- Click Submit to save the setup.
...
Let’s start with the extension for the Business Hours Menu:
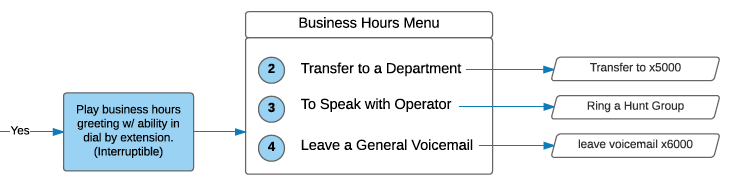
- Open the “Business Hours Menu” extension and click edit in the inbound behavior area.
- Set Step 1 to “Play a recording”. And select the recording that was created for this greeting from the list.
The greeting should include the audio instructions for the caller to press a number for the desired action. In our example, the greeting should say “Thank you for calling Our Company. For a department, press 2. To speak with the operator, press 3. To leave a voicemail, press 4. Make your selection now.”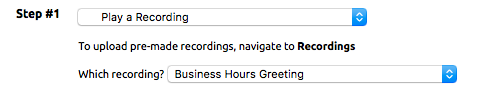
- Add a Wait command for step 2. This gives the caller a little time to make their decision after hearing all the options. Select “Wait” from the list and input the desired wait time in seconds. 2 to 5 to 10 seconds typically works well. If the caller does not select an option and there are no more steps, the menu will repeat the audio 3 times before hanging up.

- At the bottom of the inbound behavior screen, there are two check boxes. Click the one called “Allow caller to input a menu option during the above steps”. This will display a list of buttons and what the actions for each are.

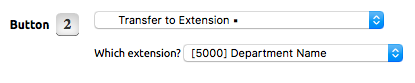
- Select in Button 2 the action “Transfer to Extension” and select the corresponding extension from the list (x5000 in our example).
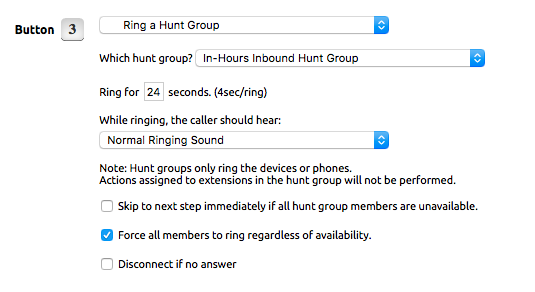
- Button 3 needs to ring a list of phones so the call can be received by a number of phones for pick up. Select “Ring a Hunt Group” for the main action. Select the premade hunt group from the second drop-down list and select the number of seconds to ring them. Check the box next to “Force all members to ring regardless of availability,” which will ensure that phones ring even if someone is on another line. This is useful for receptionist positions, or anyone managing more than one call. If the Ring time expires, the caller will be sent back to the top of the Business Hours Menu. If this is not desired, you may need to create a separate Virtual Extension to receive the call, “Ring a Hunt Group” and then send it to an additional action such as a voicemail box.
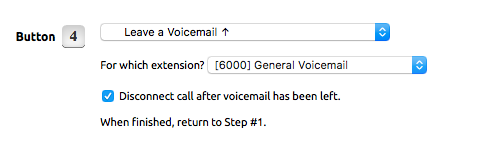
- Button 4 needs to be directed to a voicemail. Select the option “Leave a Voicemail” from the drop-down list. Select the desired extension voicemail from the list and check the box “Disconnect call after voicemail has been left”.
- Add an option for an invalid entry at the bottom of the buttons list. A good option here may be to transfer the call back to the same extension, to form a loop. If the caller does not press any buttons the extension will start back at Step 1, three times.

- Click Submit to save.
...
Test your call to make sure it works the way you want and make any needed adjustments.
This article is intended as a guide for the basic functions of setting up an auto attendant. With the flexibility of the NocTel system, you can make any menu system that you can dream up. We recommend that you start by drawing a flow chart, as it makes the process easier to visualize. If you need help in developing an auto attendant, please contact our support team at support@noctel.com
Easy Print Version: Creating an Advanced Auto Attendant.pdf
Related articles
| Content by Label | ||||||||||||||||||||
|---|---|---|---|---|---|---|---|---|---|---|---|---|---|---|---|---|---|---|---|---|
|
| Page properties | |||
|---|---|---|---|
| |||
| |