...
- Log into the NocTel Control Panel
- Click Extensions in the menu on the left-hand side.
- Click the extension that needs a class added to it from the list. You can also search for the extension using the search feature on the page.
- Click on the Permissions links next to the key symbol located below the extension’s number and name.

If you do not see the Permissions link, click on the gear icon in the upper-right corner of the page to unhide advance options for the extension.
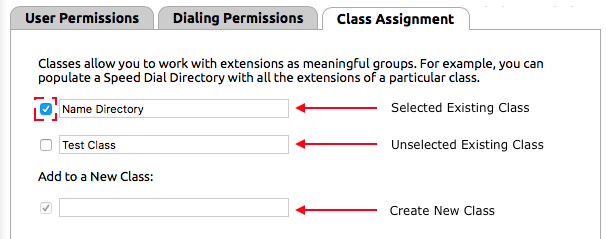
- On the new page click on the Class Assignment tab.

- The Class Assignment tab will show a list of classes that are established within the account along with a checkbox to indicate if that class is applied to the extension. Existing classes can be applied or unapplied by clicking the checkbox next to the class name. A blue checkmark indicates the class will be applied. If adding the extension to a new class, use the text box located below the Add to a New Class section
Info title Note Number and Extensions Classes are different, and number classes will not appear in the extension classes list.
Info title Important Changing a name of an existing class will affect all other extensions using this class.
- Click Submit to save the changes.

...
- Log into the NocTel Control Panel
- Click Extensions in the menu on the left-hand side.
- Click the Bulk Operations link located above the list of extensions.

- Use the Match Criteria section, to define which extensions should be added to the class. You can filter the criteria with a combination of several identifiers in different categories.
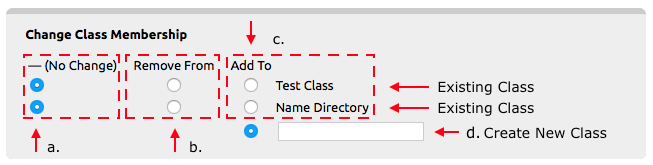
- Once the criteria for the selected extensions is set, use the area labeled Change Class Membership to edit the selected extensions class assignments. The existing classes in the account are listed with three options; No Change, Remove From, and Add To. There is also a text box under Add To where a new class can be created.
- No Change: Leave class assignments the same
- Remove From: Removes the selected class from the extensions selected.
- Add To: adds a new class to the selected extensions. Using the text box below the list of existing extensions allows for a new class to be created and the extensions added to it.
- New Class: use this test box to create a new class to add the extensions to.
- One the Class changes have been selected click the Preview Bulk Operation button at the bottom of the page.

Review and confirm that what is included in the filter(s) is correct and that the changes to be made are correct. Use the Edit this Query button to bring up the bulk options to make changes. - If the info on the preview page is correct, click the Begin Bulk Operation button. The action will queue and begin processing, once done the selected extensions will be added to or removed from the selected classes.
Printable PDF - Classes.pdf
Related articles
| Content by Label | ||||||||||||||||||||
|---|---|---|---|---|---|---|---|---|---|---|---|---|---|---|---|---|---|---|---|---|
|
| Page properties | |||
|---|---|---|---|
| |||
| |