The following will guide you through the process of adding Use this guide to add a Panasonic TGP500 Wireless or TGP600 wireless phone to your NocTel Account. account. Be sure to follow the "Adding the device as an Extension" section first. Then follow either the TGP500 or TGP600 provisioning instructions based on the model you are using.
Adding a Panasonic Device as an Extension
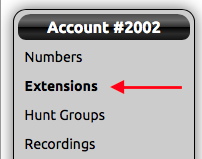
- Log in to your NocTel control panel.
- Click on Extensions in the left-hand menu.
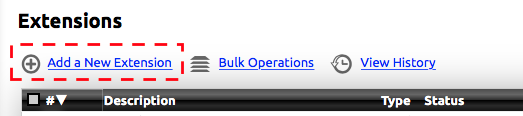
- Click the Add a New Extension link located above the extension list.
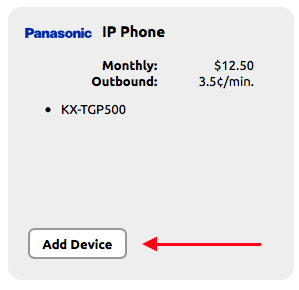
- Locate the Panasonic IP Phone area, and click Add Device.
- Enter the device’s MAC address, which is located on the phone’s base. Add an Extension number and name. Leave the "Line" section set to 1st for the first handset.
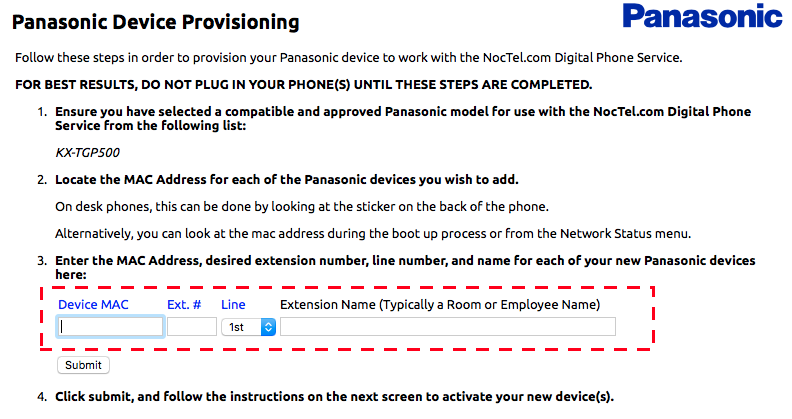
If adding more than one handset, use the new row that is created after adding the first. Use the MAC address from the main base, and select 2nd for the line.
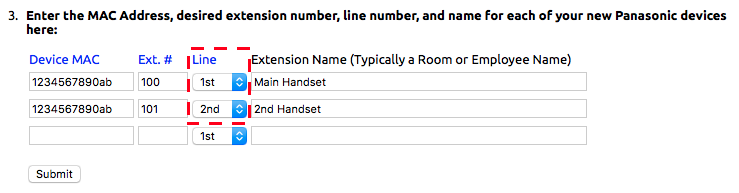
- Click Submit.
Factory Reset on Panasonic Wireless Phone
Make sure that the phone has been reset to its factory default before provisioning.
...
Panasonic KX-TGP600 Provisioning
- Connect the base to an active internet connection and power. Connect the charging base for the handset, install batteries in the handset, and place the handset on the charger.
- On the handset, click the center button and then enter #[5][3][4]. Toggle the embedded web server to on.
- the center button (menu). Then select System Settings > Network Setting > Embedded Web > On. The phone will beep to confirm the selection. (you can also navigate to this in the settings menu)Enter #[5][0][1], this will give you’re the IP address of the web interface, make note of this address
- Return to the main screen by pressing the end call or Xfer/CLR button on the handset. Click the center button (menu) > System Settings > Status > IPv4 Settings >IP Address. Note the IP address.
- Navigate to the IP address shown on the handset in a browser on your computer by entering the IP address in the address bar.
- When prompted enter customerserviceid
- for the user and cspass for the
- username and password:
- enter admin for the username
- enter adminpass for the password.
- Click the Web Port Close button in the top left. Then exit the browsers.
| Info | ||
|---|---|---|
| ||
IMPORTANT NOTE: Please note that you will by default be logged in as what you last logged into the phone web interface as. This is bad as you need to later log in with a different user and password for provisioning. It is critical to use incognito mode or two different browsers, one for the reset and one for the provisioning. Also note that both users cannot be logged in at the same time. |
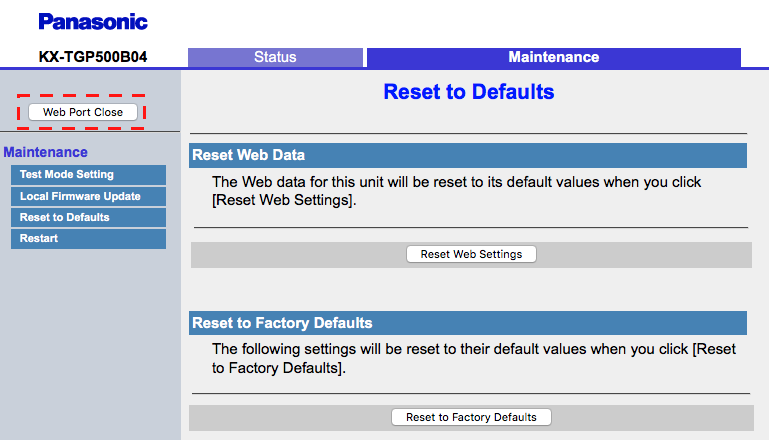
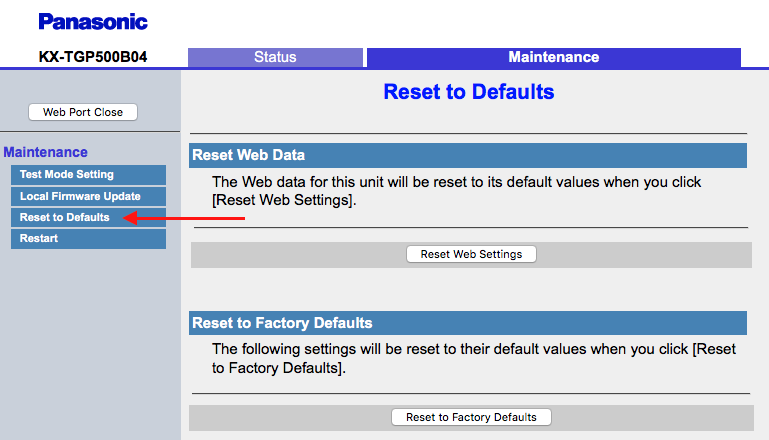
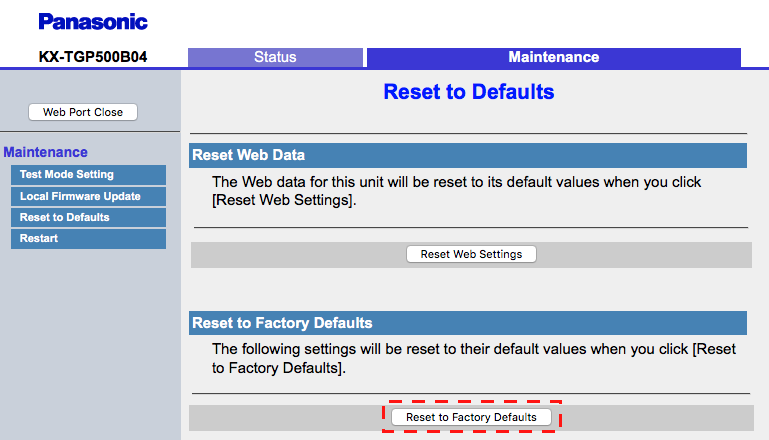
Click the Reset to Defaults tab.
Click Reset to Factory Defaults then OK.
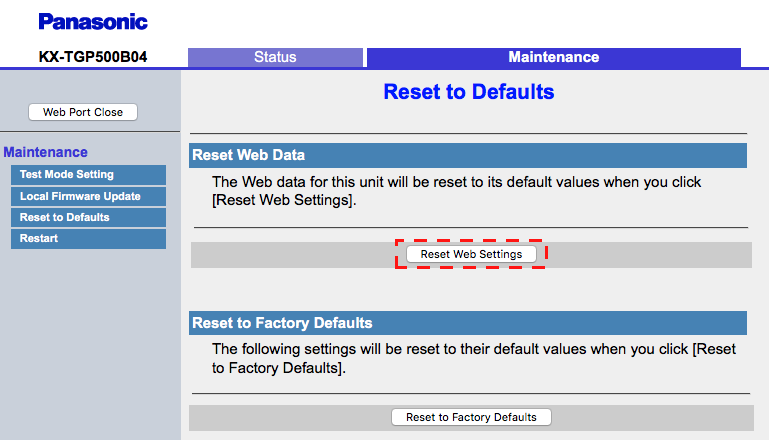
Click Reset Web Settings and then OK.
...
- Click Sign In.
- The system will prompt you to set a new admin password. Complete the fields and enter a new password you can remember and click Ok. After confirming the password change the system will make you log back in using the new password.
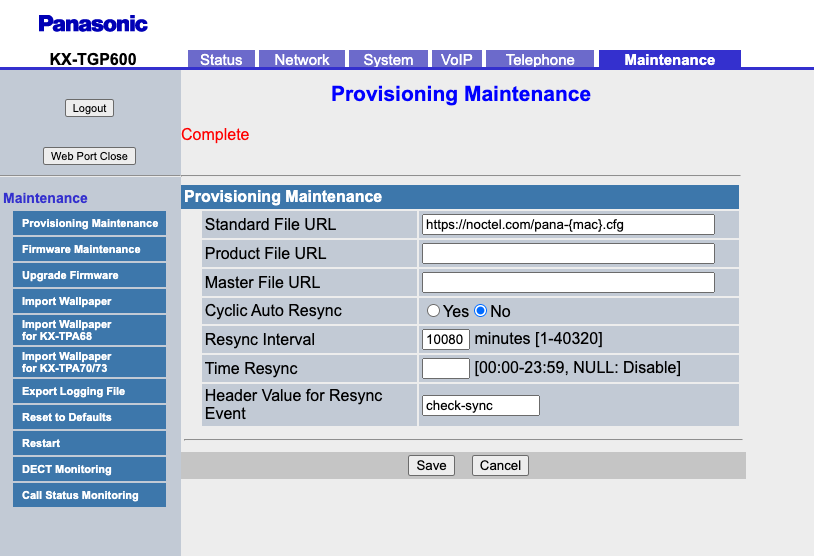
- Inside the web portal, click the Maintenance tab located at the top.
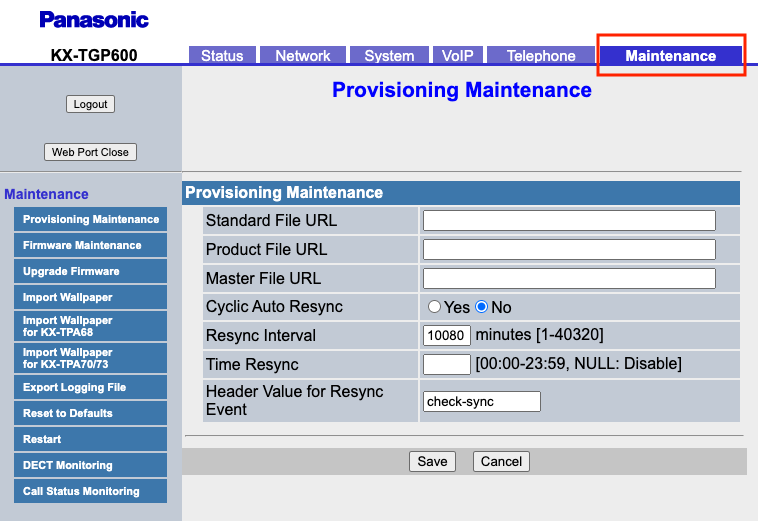
- The Provisioning Maintenance section should be displayed. If not click on Provisioning Maintenance in the left-hand menu.
- In the Standard File URL field enter the following: https://noctel.com/pana-{mac}.cfg
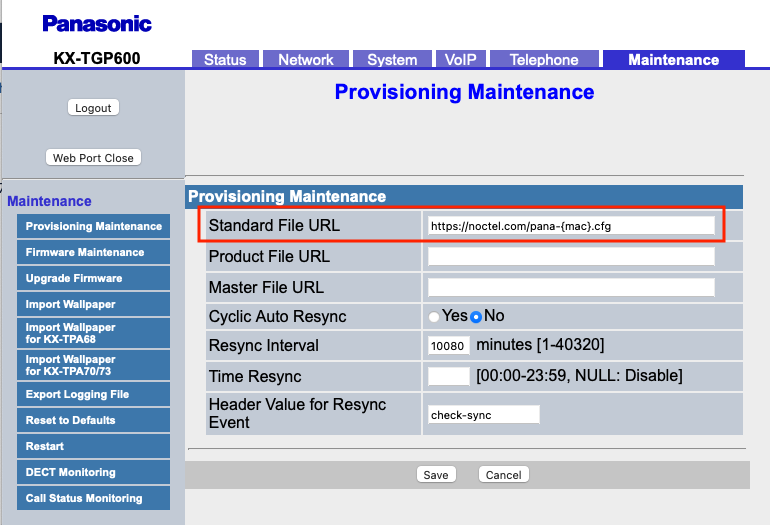
- Hit Save and wait for it to say "complete." The phone may take a few minutes to reboot and grab the new configuration. Make an outbound test call to confirm the phone is active.
| Info | ||
|---|---|---|
| ||
After provisioning is complete the admin password will be reset to 8675309 |
...
Panasonic KX-TGP500 Provisioning
- Connect the base to an active internet connection and power. Connect the charging base for the handset, install batteries in the handset, and place the handset on the charger.
- On the handset click the center button and then enter #[5][3][4]. Toggle the embedded web server to on. The phone will beep to confirm the selection.
- Return to the main screen, click the center button of the handset, and enter #[5][0][1] and make a note of the IP address given.
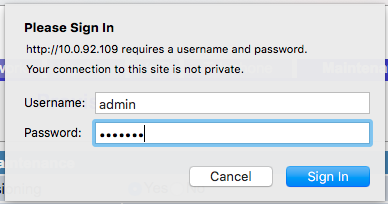
- Navigate to the IP address in a browser on your computer, by entering the IP address in the address bar.
- When prompted enter admin for the username and adminpass for the password. Click Sign In.
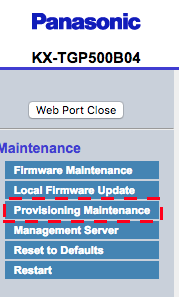
- Inside the web portal, click the Maintenance tab located on the top

- Click on the on Provisioning Maintenance in the left-hand menu.
- In the Standard File URL field enter the following: https://noctel.com/pana-{mac}.cfg
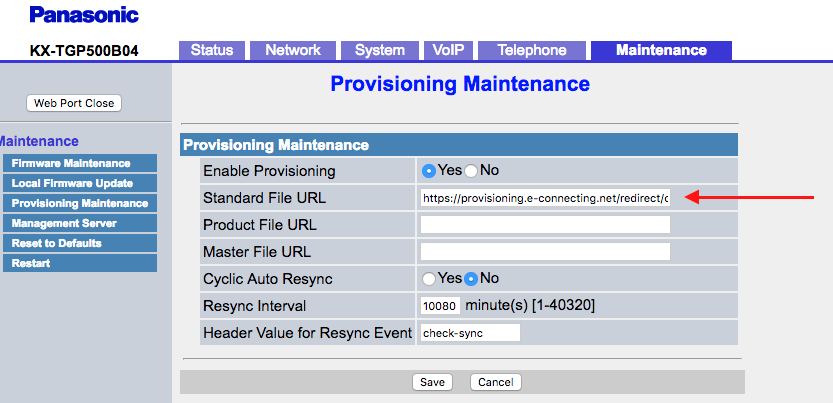
- Hit Save and wait for it to say complete.
- Ensure that the provisioning as taken effected by clicking on the Telephone tab, (It can sometimes be slow, be patient). The portal will ask you to log in again. This time use the username: admin and the password: 8675309. You may have to enable the web server on the handset again, using the #{5][3][4] code. You should see the extension numbers set as the phone numbers for the handsets.

- Close the web portal and test inbound and outbound calling for the handset.
Printable Version - Provisioning a Panasonic TGP500.pdf
...
Factory Reset on Panasonic KX-TGP 500 Wireless Phone
Make sure that the phone has been reset to its factory default before provisioning.
- Connect the base to an active internet connection and power. Connect the charging base for the handset, install batteries in the handset, and place the handset on the charger.
- On the handset click the center button and then enter #[5][3][4]. Toggle the embedded web server to on. The phone will beep to confirm the selection. (you can also navigate to this in the settings menu)
- Enter #[5][0][1], this will give you the IP address of the web interface, make note of this address.
Navigate to the IP address in a browser. When prompted enter customerserviceid for the user and cspass for the password.
Info title Important Note! IMPORTANT NOTE: Please note that you will by default be logged in as what you last logged into the phone web interface as. This is bad as you need to later log in with a different user and password for provisioning. It is critical to use incognito mode or two different browsers, one for the reset and one for the provisioning. Also, note that both users cannot be logged in at the same time.
- Once logged in click the Maintenance tab on the top.
- Click the Reset to Defaults tab.
- Click Reset to Factory Defaults then OK.
- Click Reset Web Settings and then OK.
- Click the Web Port Close button in the top left. Then exit the browsers.
Related articles
| Content by Label | ||||||||||||||||||||
|---|---|---|---|---|---|---|---|---|---|---|---|---|---|---|---|---|---|---|---|---|
|
| Page properties | |||
|---|---|---|---|
| |||
| |